How to install Consent Studio in combination with gtag.js
Installation with gtag.js, instead of Google Tag Manager
Last updated 3 days ago
Installation of the Consent Studio CMP for Google Consent Mode v2 in combination with gtag.js
Add the Consent Studio Installation Code directly in the <head> of your website, as high as possible and before gtag.js. This is the Code path the Installation Wizard recommends when you can edit your website's code, including when you already use Google Tag Manager and choose No preference. Why the order matters: see Google Consent Mode Load Order.
Prerequisites
Make sure that you have basic knowledge of HTML and JavaScript before using this installation method.
Make sure that you understand the difference between Google Tag Manager and gtag.js. This help article from Google can help you understand the difference.
Make sure that you understand Google Consent Mode and the different types of consent signals and the data redaction option.
1. Make sure that you have an account with Consent Studio
Log in to the Consent Studio dashboard. If you do not yet have an account, you can create one here:
2. Adding the script to your website
We recommend going to the installation page inside of the dashboard. On the dashboard, navigate to the installation page via the top navigation bar and click on Install Consent Studio.
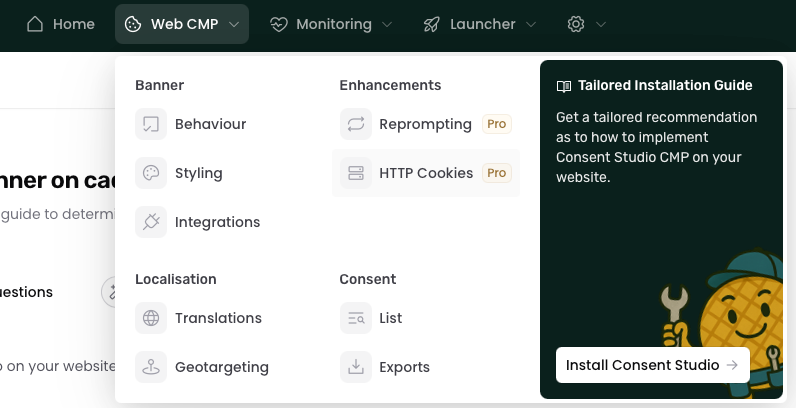
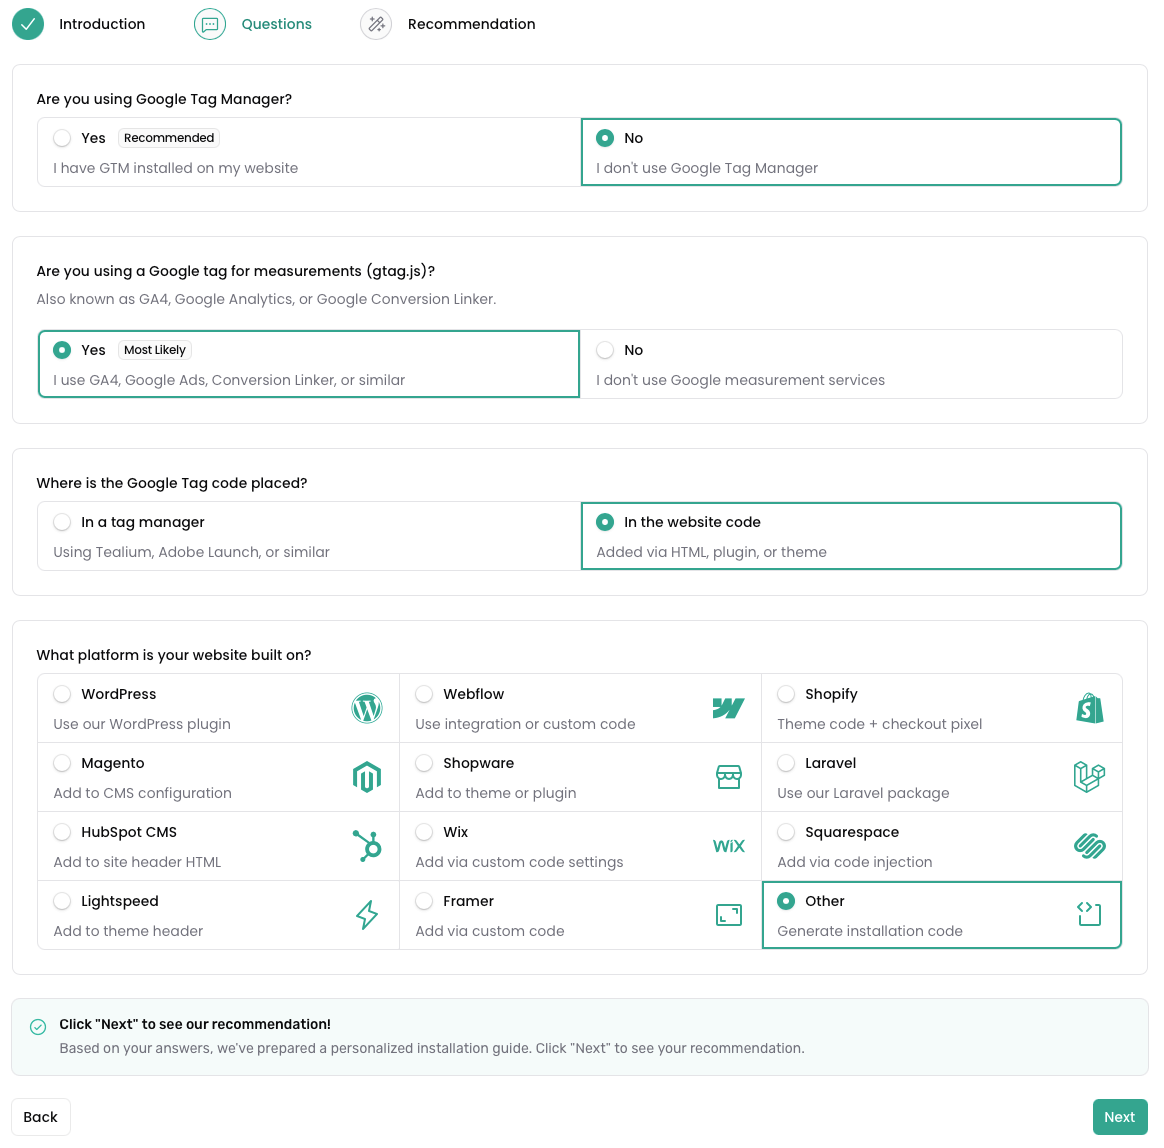
When you’ve landed on the installation page, click Next and fill in the questionnaire to get your recommendation. For this guide, answer: your platform under What platform is your website built on?; Yes to Are you comfortable editing your website's code, and do you have access to do so?; if you are asked Are you using Google Tag Manager? answer No, or answer Yes and choose Code or No preference under Do you have a preference for installation?; and Yes to Are you using Google Analytics and/or the Google Conversion Linker on your website? Below is an example of what it should look like:
Once you’ve landed on the Recommendation step, you’ll find the Installation Code block, ready to paste on your website. Optional Modify Script toggles let you, for example, add the GTM container script or Google Tag example code below the Consent Studio code. Under Placement is important, the wizard tells you to add this code to the <head> section of your website. It must load before GTM or other Google scripts (Google Tag, Conversion Linker). Put it as high in the <head> as possible, and do not lazy-load, defer or delay it.
Already have the Consent Studio tag in Google Tag Manager? Once this code is live in your <head>, remove the Consent Studio tag from GTM so Consent Studio does not load twice.
Example of what the code should look like:
<script type="text/javascript">   /***********************************************
* Consent Studio - European CMP
* 🇳🇱 Built in the Netherlands
* 🇪🇺 100% European-owned infrastructure
*
* Questions? support@consent.studio
* Documentation: https://learn.consent.studio    ***********************************************/
/** Configuration (customize as needed) */
window.bakery = window.bakery || {
   debug: false,
   force_domain: null,
   googleConsentMode: {
      enabled: true,
      wait_for_update: 500,
      defaults: {
         ad_storage: "denied",
         ad_user_data: "denied",
         ad_personalization: "denied",
         analytics_storage: "denied",
         functionality_storage: "granted",
         personalization_storage: "granted",
         security_storage: "granted"
      }
   }
};

/** Consent Studio Implementation [Do Not Touch] */
(function(m,a,r,t,i,n){var g=window.bakery.googleConsentMode;   r=location;if(g&&g.enabled){window.dataLayer=window.dataLayer||[];function gtag({dataLayer.push(arguments)}   m="granted";a="denied";i=g.defaults|{ad_storage:a,ad_user_data:a,ad_personalization:a,analytics_storage:a,functionality_storage:mpersonalization_storage:m,security_storage:m};   if(r.hash.substr(1,7)=="cs-scan"){gtag("consent","default",{ad_storage:m,ad_user_data:m,ad_personalization:m,analytics_storage:m,functionality_storage:m,personalization_storage:m,security_storage:m,wait_for_update:g.wait_for_update})}else{if(Array.isArray(i)){for(t=0;t<i.length;t++){n=Object.assign({},i[t],{wait_for_update:g.wait_for_update});gtag("consent","default",n)}}else{gtag("consent","default",Object.assign({},i,{wait_for_update:g.wait_for_update}))}}if(g.ads_data_redaction)gtag("set","ads_data_redaction",true);if(g.url_passthrough)gtag("set",url_passthrough",true);gtag("set","developer_id.dZTlmZj",true)}if(window.bakery._loaded)return;window.bakery._loaded=1;n=document.createElement('script');n.src='https://consent.studio/'+(window.bakery.force_domain||r.hostname)+'/banner.js';document.head.appendChild(n)})();</script>
Also...
...if needed, adjust the default consent signals;
...if needed, adjust the default
wait_for_updateparameter;...and remove any other CMP that may have already been installed on your page to prevent conflicts
What does this script do?
Firstly, it defines the basics: it initialises the dataLayer variable and provides us with a shorthand function to easily push information to this variable.
Secondly, we set the default consent signals for Google Consent Mode. In our example, all categories (except security_storage) are instructed to default to denied. This is the same behaviour that our Google Tag Manager tag template has.
Thirdly, we set the value for ads_data_redaction. As referred to from the code snippet above, more information about this flag can be found here in the official documentation by Google. Accepted values are true and false.
Then, the Consent Studio developer ID is set. This is our signature use so that Google can recognise our CMP.
Lastly, we will load the actual banner script into the website.
3. Customise your cookie banner
You can do so in your Consent Studio dashboard. More details can be found in this article.
4. Monitor your implementation
If Monitoring shows the urgent recommendation Google Consent Mode Load Order, the Consent Mode defaults are set too late. Follow Google Consent Mode Load Order.
Now that you have finalised your implementation, we recommend keeping an eye on what your Consent Studio dashboard (we have a health check page that becomes available to you when issues are detected by our scanner) and the implementation status from within Google services (such as Google Analytics and Google Ads) inform you about.
Please contact consent.studio first, before contacting Google support.
Also, please keep an eye on whether our cookie scanner actually finds cookies on your website. If your website does use cookies, but our scanner does not find any, it may because of any of these causes:
You do not have the correct domain registered with consent.studio;
You have another CMP installed on the domain;
No scan has ran just yet (please wait up to 15 minutes after registration for your initial scan to start)
Was this helpful?
Still need help? Ask the team